Blogs

Harvest to Home: A DIY Guide on Making Dry Herbs in Simple Steps
Are they fed up with the high costs of store-bought herbs that work wonders for your food’s flavour? Despite their price tags, dry herbs can significantly elevate your culinary experience. Beyond their role as taste enhancers, these herbs boast robust healing potential. Throughout history, dry herbs were indispensable in folk medicines, stepping in when antibiotics and modern medicines weren’t an option. Today, they serve as delightful condiments, imparting an aromatic touch to your dishes. Suppose you’re eager to begin crafting your dry herbs at home; worry not. We’ve compiled a set of guidelines to make the process a breeze!
A DIY Guide on Making Dry Herbs in Simple Steps
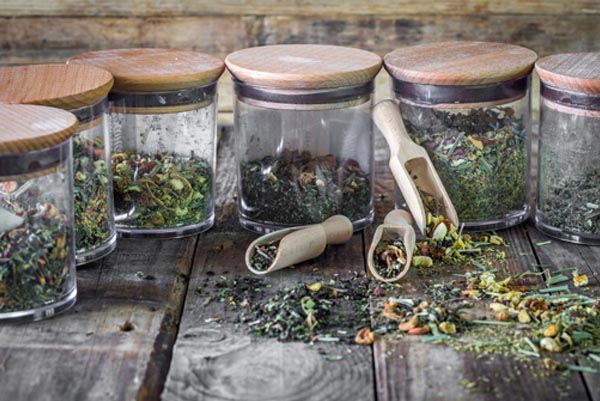
Making dry herbs at home is a simple and rewarding process that allows you to preserve the flavours and aromas of fresh herbs for later use. Here’s an essential guide on how to make dry herbs at home:
Materials Needed:
- Use fresh herbs (such as basil, rosemary, thyme, oregano, mint, etc.).
- Kitchen scissors or pruning shears
- String or twine
- Brown paper bags or small paper sacks
- An excellent, dry, and dark space for drying
Also Read This :Plant These 8 Lucky Plants at Home in the New Year 2024
How To Make Dried Herbs At Home
Harvesting:
- Please choose when the herbs peak, usually in the morning after the dew has dried but before the sun gets too hot.
- Harvest the herbs using scissors or shears, leaving some growth on the plant for continued growth.
Cleaning:
- Rinse the harvested herbs under cold running water to remove dirt or insects.
- Gently pat them dry with a clean kitchen towel or paper towel.

Also Read This :Biochar Brilliance: Enhancing Soil Health for Sustainable Agriculture
Bundling:
- Group the herbs into small bunches. A good size is about 5-10 stems per bundle.
- Tie each bundle with twine or string, leaving enough length to hang them.
Hanging to Dry:
- Find a dry, dark, and well-ventilated space for drying. A pantry, closet, or even a dry basement works well.
- Hang the herb bundles upside down. Ensure good air circulation around each bundle.
Also Read This :Tips For Curry Plant Growth: Secrets to Rapid Curry Plant Growth
Drying Time:
- Allow the herbs to air-dry for about 1-2 weeks. The drying time can vary depending on the humidity in your area.
- Herbs are ready when they are dry and crumbly to the touch.

Testing for Dryness:
- Check a few leaves by crushing them. If they crumble easily, the herbs are ready.
- The leaves need more time to dry if they are still flexible or moist.
Also Read This :Natural Garden Elixirs: 10 Surprising Fertilizers to Keep Your Garden Green
Storage:
- Once dry, remove the leaves from the stems and store them in airtight containers away from direct sunlight.
- Label each container with the herb type and date of drying.
Also Read This :Home Gardening Delight: A Guide to Cultivating Fresh Lemongrass with Ease
Tips on Making Dry Herbs
Choose the Right Time: Harvest herbs just before they flower, as this is when the essential oils are most concentrated.
Avoid Moisture: Ensure the herbs are dehydrated before storing them to prevent mould.
Quick Drying Option: You can use a food dehydrator or an oven set to the lowest temperature for a faster option.
Making your own dried herbs at home provides you with a fresh supply of aromatic herbs and allows you to control the quality of the herbs and avoid additives often found in store-bought options.
Also Read This :Green Guardians: Exploring the Best Plants Used for Hedges
Is It Cheaper To Dry Your Herbs?
Absolutely! Crafting your dry herbs at home is a more cost-effective option and offers a superior taste compared to store-bought alternatives. Also, making your dry herbs can minimise food waste, as you control the quantity you produce. Homemade dry herbs have a commendable shelf life, lasting 1 to 3 years when stored in airtight containers. To preserve their quality further, consider refrigerating them to keep moisture at bay. Elevate your culinary creations using homemade dry herbs to season various dishes, including pizzas, sandwiches, soups, sauces, and gravies.
Also Read This :How to Growing Krishna Kamal, Lord Krishna’s Favorite Flower, at Home
Why To Dry Herbs At Home
Drying herbs at home offers numerous advantages. Firstly, it’s a cost-effective alternative to purchasing store-bought options, saving you money in the long run. The process allows you to savour the superior taste of freshly dried herbs, elevating the flavour of your dishes. Homemade dried herbs are a culinary delight and contribute to reducing food waste, as you can control the quantity produced. Crafting your own dry herbs also ensures they remain free from additives commonly found in commercial products. With a shelf life of 1 to 3 years, properly stored homemade herbs are a convenient and sustainable way to enhance your cooking endeavours.
Also Read This :Embracing the Beauty of Indoor Plants with Striking Red Leaves
Drying herbs at home is a simple and cost-effective way to enhance your culinary experience. Choose from various methods such as air drying, oven drying, or using a food dehydrator. Bundle fresh herbs and hang them in a dark, well-ventilated area for air drying. Alternatively, lay them on a tray for oven drying at low temperatures. A food dehydrator offers a quicker option with precise temperature control. Whichever method you choose, ensure the herbs are dehydrated before storing them in airtight containers. Enjoy the convenience and satisfaction of having your own aromatic, home-dried herbs for flavorful dishes year-round.
Also Read This :Right Direction to Keep Tulsi Plant in Your Home